Introduction
In the world of machine learning and artificial intelligence, accurate and well-labeled data is crucial for training models that perform effectively. CVAT (Computer Vision Annotation Tool) is an open-source annotation tool designed for annotating image and video data, supporting a wide range of use cases such as object detection, image segmentation, and video tracking.
This guide will walk you through everything from setting up CVAT on your local machine to managing projects, performing annotations, and extracting your annotated data for machine learning model training. Whether you’re a beginner or an experienced user, this guide will provide you with a thorough understanding of how to use CVAT effectively.
What is CVAT?
CVAT is a web-based tool developed by Intel, aimed at simplifying the process of annotating images and videos for computer vision applications. It allows teams to collaboratively annotate large datasets with different formats and tasks, such as bounding box creation, image segmentation, and object tracking.
Key Features of CVAT
- User-friendly interface: CVAT provides an intuitive interface, making it easy for both beginners and experts to navigate.
- Multiple annotation formats: It supports several annotation formats, including PASCAL VOC, COCO, TFRecord, and more, which can be exported for use in machine learning models.
- Task-based management: Projects are divided into manageable tasks, which can be assigned to different annotators. This helps in organizing data annotation efforts efficiently, especially for large teams.
- Machine learning model integration: CVAT allows you to integrate pre-trained machine learning models to speed up the annotation process with auto-labeling features.
- Supports video and image annotation: You can annotate both static images and dynamic video data with tools like bounding boxes, polygons, key points, and semantic segmentation.
Benefits of Using CVAT for Data Annotation
- Scalability: CVAT is perfect for handling large datasets, making it ideal for enterprise-scale projects.
- Collaborative environment: Multiple users can work on the same project, with clear roles for annotators, supervisors, and administrators.
- Customizable: Users can modify or extend the tool’s capabilities with plugins or custom scripts.
CVAT vs Other Annotation Tools
While CVAT is popular, other annotation tools like Labelbox, Supervisely, and VGG Image Annotator (VIA) exist. However, CVAT offers several advantages, including its open-source nature, ease of use, and flexibility for handling different data types, making it a strong contender for large-scale annotation tasks.
Creating CVAT Account
Creating an account on the CVAT website is simple. Follow these steps:
- Visit the CVAT Website: Navigate to CVAT’s official website.
- Click on “Sign Up”: On the homepage, locate and click the “Sign Up” button.
- Fill in Your Details: Enter your email address, create a secure password, and provide your full name.
- Verify Email: Check your inbox for a verification email and click the provided link to confirm your account.
- Log In: Return to the CVAT website, log in with your email and password, and start using the platform!
Enjoy annotating with CVAT
Setting Up CVAT
2.1 Prerequisites
Before setting up CVAT, ensure you have the following:
Operating System: CVAT can run on Linux, macOS, or Windows. Docker is used to containerize the setup process, making the installation easier across different systems.
Software Tools:
Docker: CVAT uses Docker for containerization, so you’ll need Docker and Docker Compose installed on your machine.
Git: Required to clone the CVAT repository from GitHub.
Python: Necessary for running scripts or additional services related to CVAT.
2.2 Installation Process
1. Install Docker
First, ensure you have Docker and Docker Compose installed. Here’s a basic guide for each platform:
For Linux: Run the following commands to install Docker and Docker Compose:
bash
sudo apt-get update
sudo apt-get install docker-ce docker-ce-cli containerd.io
sudo apt-get install docker-compose
For macOS and Windows: Download Docker Desktop from the official website and follow the installation instructions.
2. Clone the CVAT Repository
After installing Docker, you can clone the CVAT repository:
git clone https://github.com/openvinotoolkit/cvat.git
cd cvat
3. Build the Docker Containers
Run the following commands to set up the Docker containers and build CVAT locally:
docker-compose build
docker-compose up
This will initialize the necessary services and make CVAT accessible from your local server (usually http://localhost:8080).
4. Create a Superuser Account
Once the Docker containers are up and running, you can access CVAT via a web browser at http://localhost:8080. The first time you log in, you’ll need to create a superuser account:
Provide the required username, email, and password.
docker exec -it cvat bash
python3 manage.py createsuperuser
3 Initial Configuration
- Database Setup: CVAT supports two types of databases: SQLite (default, for small projects) and PostgreSQL (for larger projects). PostgreSQL is recommended for handling bigger datasets and multi-user environments.
- Email Notifications: If you want to enable email notifications for your users, configure SMTP settings within the docker-compose.yml file.
4 Troubleshooting Setup Issues
Common issues during setup can include:
- Port conflicts: If port 8080 is in use, change the port in docker-compose.yml.
- Database errors: Ensure your database is running and properly configured. For PostgreSQL, check the connection strings.
- Permission issues: Run Docker commands with elevated permissions if necessary (e.g., sudo).
Navigating the CVAT Interface
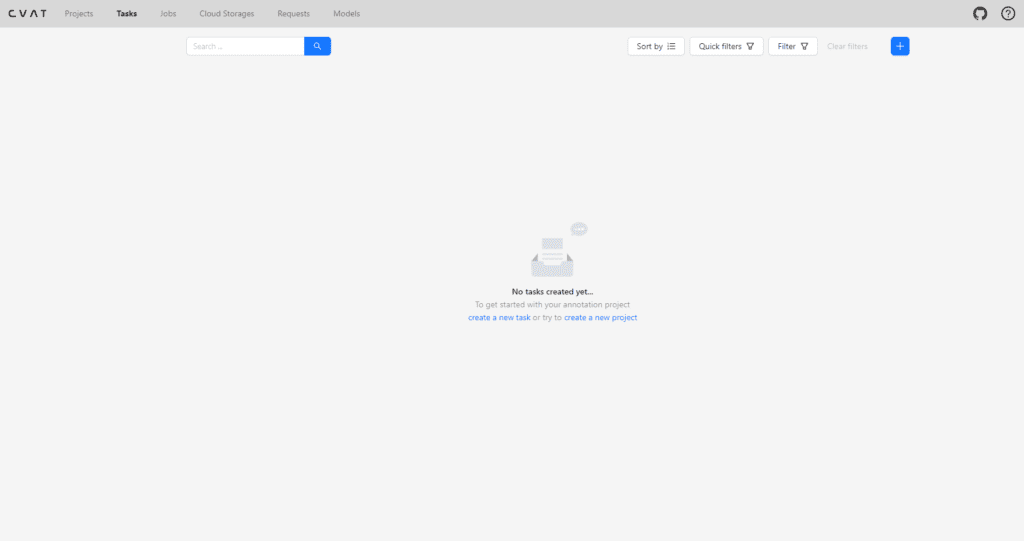
1 CVAT Dashboard
Upon logging into CVAT, you’ll see the dashboard, which is the central hub for managing projects and tasks. The dashboard is divided into sections:
- Project Management: Manage all your active and archived projects.
- User Management: Add users and assign roles such as annotator, supervisor, or admin.
- Task List: View all tasks associated with your projects, along with their statuses.
2 Creating and Managing Projects
To create a new project:
- Go to the Projects section and click on Create New Project.
- Enter the project name, description, and select the annotation type (e.g., Image Classification, Object Detection).
- Upload your dataset (either via direct file upload or a URL).
- Set the appropriate configurations such as image size, labeling options, etc.
Once the project is created, tasks can be assigned to annotators, and progress can be tracked.
3 User Permissions and Roles
In CVAT, user roles define the access levels and capabilities:
- Admin: Full control over the project, including task creation, user management, and settings.
- Annotator: Limited to annotating tasks and submitting them for review.
- Supervisor: Can review, edit, and approve annotations, ensuring quality control.
Annotating with CVAT
Annotation is the core functionality of CVAT. It is essential for preparing datasets for machine learning models. This section explores the tools and techniques available in CVAT for annotating images and videos, along with examples, best practices, and case studies to ensure accurate and efficient annotation.
1 Importing Data into CVAT
Before you can begin annotating data, it needs to be uploaded into CVAT. CVAT supports a variety of file types for both images and videos.
1. Supported Data Formats
- Images: JPEG, PNG, TIFF, BMP, etc.
- Videos: MP4, AVI, MOV, MKV, etc.
Example:
- For an object detection task involving traffic cameras, you could upload a folder of JPEG images of street scenes or MP4 video clips from cameras monitoring traffic. Each frame or video segment will be annotated based on the task at hand.
2. Uploading Data
To upload data, follow these steps:
- In the Dashboard, click on the Project where you want to add data.
- Select Create Task or edit an existing task.
- Click Upload Files, select the dataset from your local machine, and upload it.
Once the data is uploaded, CVAT will organize it into manageable tasks that you can begin annotating.
2 Annotation Tools Overview
CVAT offers a variety of annotation tools, each designed for different types of annotations. Here’s an overview of each tool and how to use it.
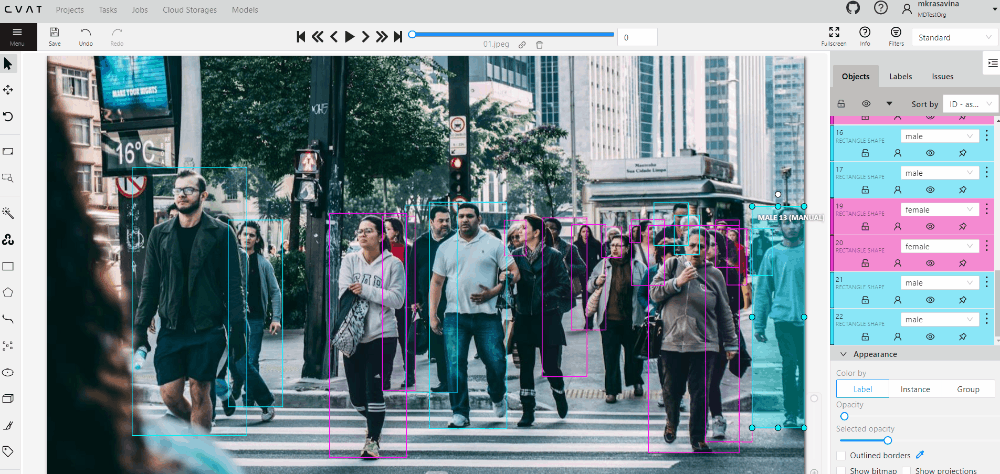
1. Bounding Boxes
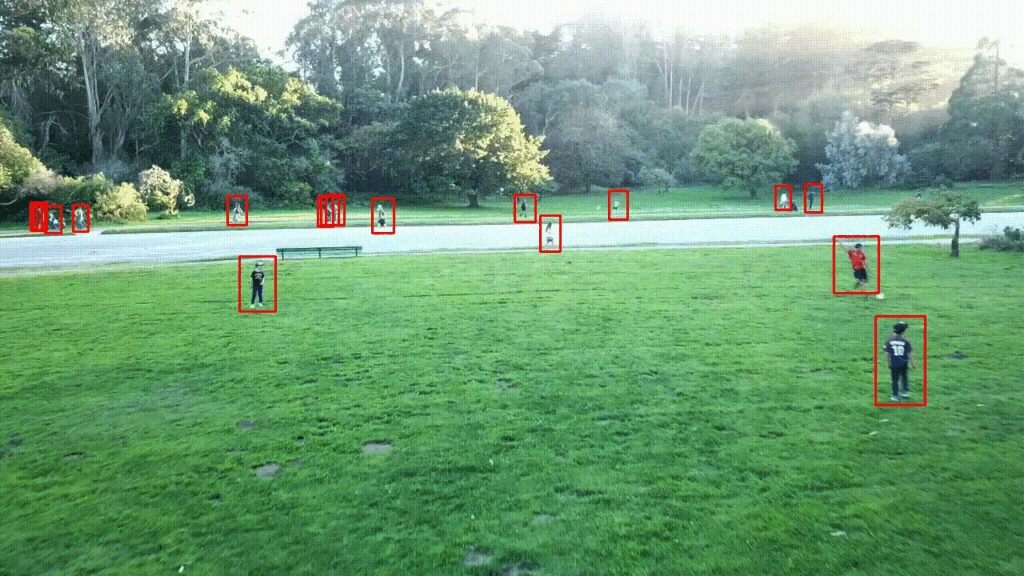
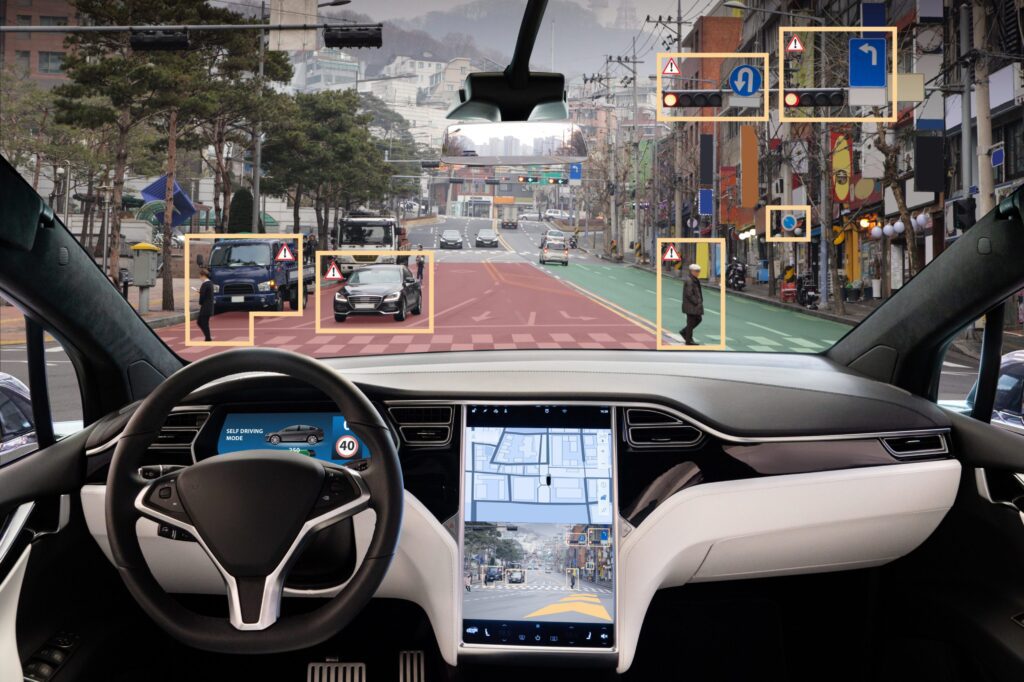
Bounding boxes are used to mark the location of objects in images and videos. This tool is essential for object detection tasks, where you need to locate and classify objects like cars, pedestrians, or animals in images or video frames.
Example:
In a dataset of images of cars on the road, you would use bounding boxes to identify each car and label it with the appropriate class (e.g., car, truck, motorcycle).
Steps:
- Select the Bounding Box tool from the annotation toolbar.
- Click and drag to create a box around the object.
- Assign the label (e.g., car, pedestrian, traffic sign).
- Adjust the box by dragging its edges if needed.
Best Practices:
- Precision: Ensure that the bounding box tightly encloses the object, leaving no significant empty space.
Consistency: Apply the same labeling conventions consistently across the dataset (e.g., always use car for vehicles, not vehicle or automobile)
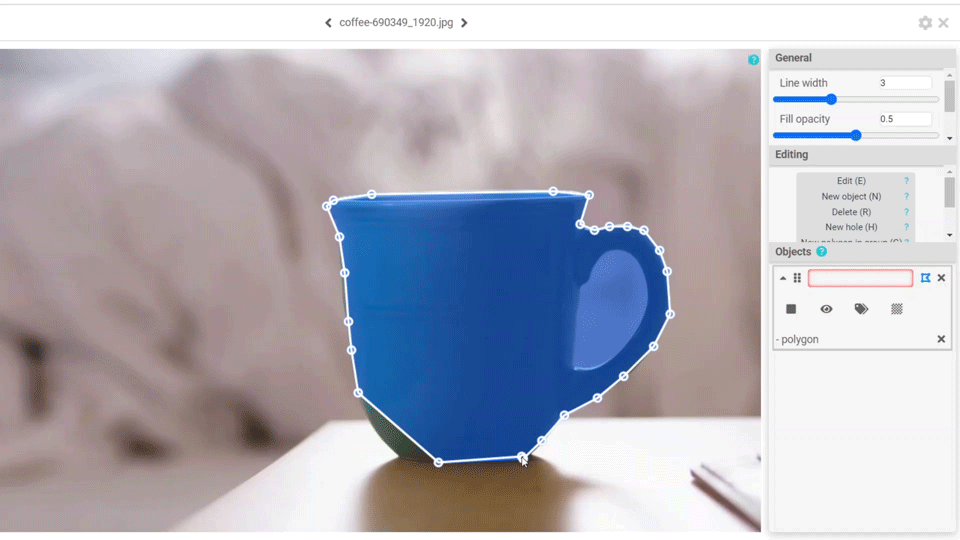
2. Polygons
Polygons are more flexible than bounding boxes and are used for segmentation tasks, where you need to annotate the precise boundaries of irregularly shaped objects.
Example:
In a dataset of satellite images, you may need to annotate forest areas, which can have highly irregular shapes. Using polygons, you can create a precise outline around the forest’s boundaries.
Steps:
- Select the Polygon tool.
- Click to place vertices around the object.
- Close the polygon by connecting the last vertex to the first one.
- Label the polygon (e.g., forest, building, etc.).
Best Practices:
- Minimize complexity: Use a reasonable number of vertices to ensure the polygon closely follows the object’s shape, but avoid excessive detail.
- Close shapes: Always ensure polygons are closed to avoid data errors.
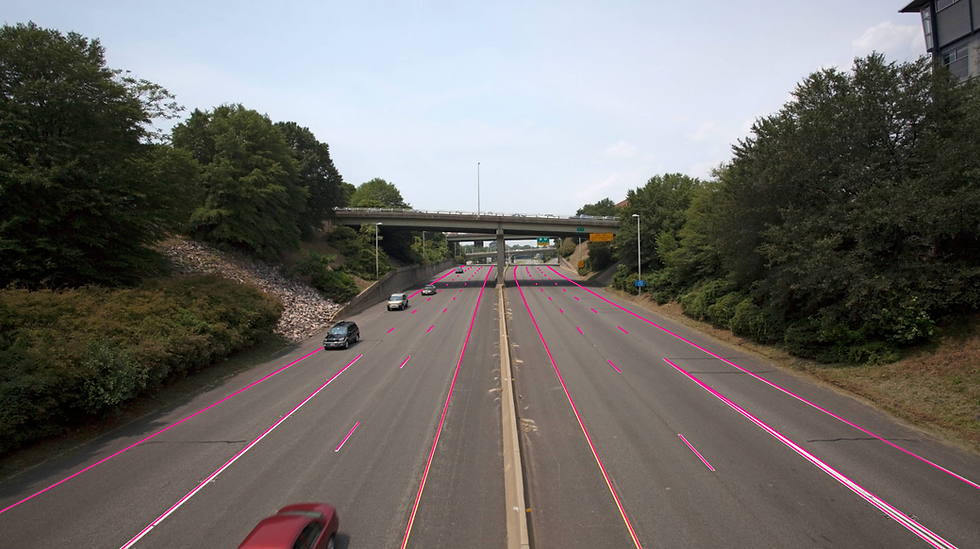
3. Lines and Polylines
Lines and polylines are used to annotate objects that have a continuous or path-like structure, such as roads, pipelines, and tracks. Polylines are especially useful for annotating road networks in satellite images or annotating the path of moving objects in videos.
Example:
For a road detection task in satellite images, you would use polylines to trace the road network.
Steps:
- Select the Polyline tool.
- Click to place points along the path you want to annotate.
- Complete the polyline by clicking the endpoint.
Best Practices:
- Straight lines for straight objects: Use straight lines where applicable (such as for highways or railroads) to reduce annotation complexity.
- Detailing: For curved objects like rivers, ensure to place enough points to follow the object closely.
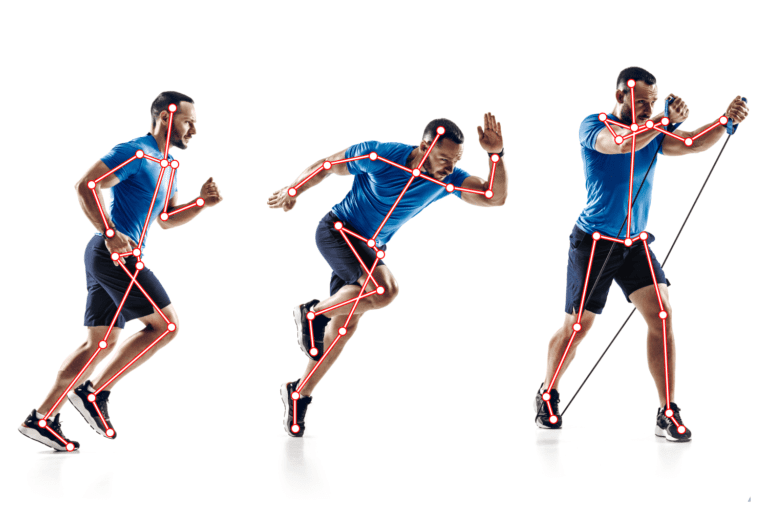
4. Key Points
Key points are used to annotate specific points on objects. This tool is essential for landmark annotation tasks, where you need to locate specific features, such as facial landmarks or joint locations in human poses.
Example:
In a facial recognition task, you would use key points to annotate the eyes, nose, and mouth of individuals in images.
Steps:
- Select the Key Points tool.
- Click on the specific locations you want to mark (e.g., eye corners, nose tip).
- Label each point (e.g., left eye, right eye, mouth corner).
Best Practices:
- Accurate placement: Place key points as precisely as possible at the relevant feature to maintain consistency and data quality.
- Use enough points: For human pose detection, annotate all relevant key points (e.g., elbows, shoulders, knees, etc.).
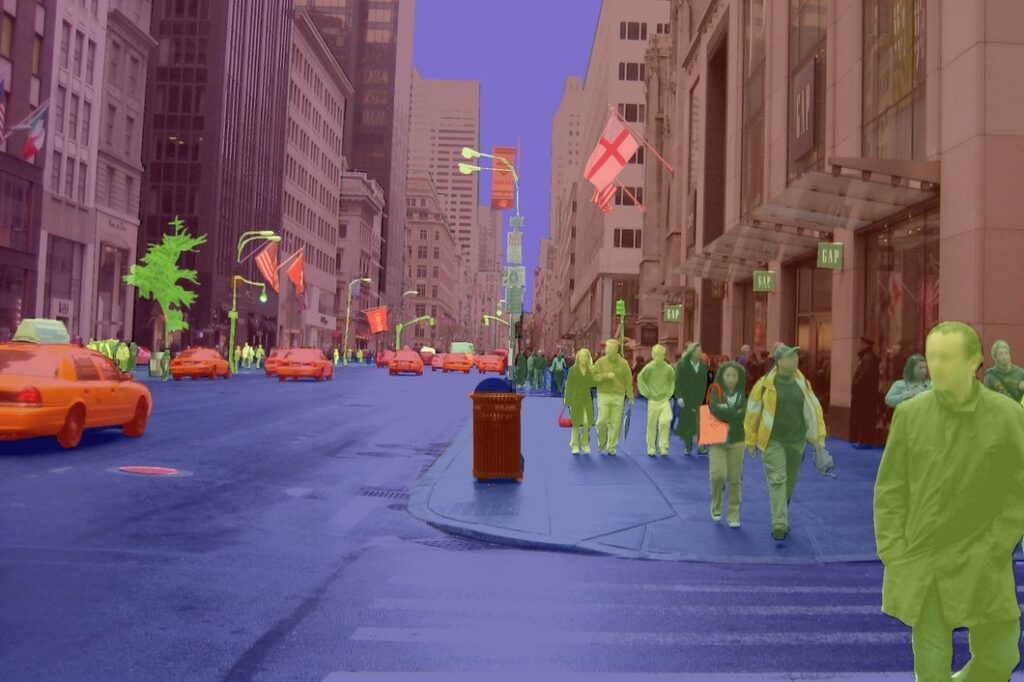
5. Semantic Segmentation
For tasks involving pixel-level accuracy, semantic segmentation is required. This technique involves labeling every pixel in an image to identify different objects or regions.
Example:
In a medical imaging task, you might need to segment the tissue regions in CT scans or MRI images.
Steps:
- Select the Semantic Segmentation tool.
- Use the brush to paint over the regions of interest in the image.
- Assign the correct label to the segmented area (e.g., tumor, healthy tissue).
Best Practices:
- Consistency: Maintain consistency in labeling pixel regions (e.g., always use the same threshold to determine what constitutes healthy tissue).
- Refinement: Carefully refine the edges of your segmented regions to avoid mislabeling small details.
3 Annotating Video Data
CVAT also supports video annotation, which introduces additional features such as frame-by-frame annotation and object tracking.
1. Frame-by-Frame Annotation
In video annotation, objects may change positions, shapes, or orientations from one frame to the next. You need to annotate these objects frame by frame, ensuring that the annotations are accurate for every frame.
Example:
In a surveillance video where you are tracking a moving car, you would draw bounding boxes around the car in each frame of the video.
Steps:
Select the tool (e.g., bounding box or polygon).
Annotate the object in the first frame.
Move to the next frame, adjust the annotation to the new position of the object, and repeat until the end of the video.
2. Object Tracking
For moving objects, CVAT supports automatic tracking and interpolation to speed up annotation. This feature uses algorithms to track objects between consecutive frames.
Example:
In a vehicle tracking task, once you annotate a vehicle in the first frame, CVAT can use the tracking tool to automatically propagate the bounding box or polygon to subsequent frames.
Steps:
Annotate an object in the first frame (e.g., draw a bounding box around a car).
Select the Tracking option to enable CVAT to track the object across frames.
Best Practices for Video Annotation:
Keyframe annotation: Annotate keyframes where objects change significantly, and let CVAT handle interpolation for the intermediate frames.
Manual corrections: Even with tracking, manually adjust annotations for frames where the object’s movement deviates sign
4 Collaborative Annotation Workflow
In large projects, multiple annotators might be working on the same project. CVAT’s collaborative features make it easy to manage and coordinate annotations between teams.
1. Assigning Tasks
Admin Role: The admin creates tasks, sets deadlines, and assigns annotators to each task.
Annotator Role: Annotators are given tasks, and they start annotating the images or videos assigned to them.
Supervisor Role: Supervisors review and approve annotations, providing feedback if necessary.
Example:
In a large project to annotate road images for autonomous vehicles, the admin could divide the dataset into smaller tasks, assigning each annotator a subset of images to work on. Supervisors can review the work and approve annotations that meet the quality standards.
2. Feedback and Quality Control
Using the comments and review features, supervisors can provide feedback to annotators, ensuring that annotations meet the required standards.
Best Practice:
Clear communication: Provide detailed feedback to annotators to avoid confusion and reduce the time spent on corrections.
Iterative feedback: After an annotator revises their annotations, supervisors should verify them promptly to ensure consistency.
5 Case Study: Annotating for Autonomous Vehicles
In this case study, we describe a project where CVAT was used to annotate camera footage of streets to train an object detection model for an autonomous vehicle system.
Problem:
The task was to annotate 10,000 images of streets taken from a moving vehicle, with various objects (e.g., cars, pedestrians, street signs) to train a machine learning model for object detection.
Solution:
Step 1: Data was uploaded into CVAT, and the bounding box tool was used for annotating cars and pedestrians.
Step 2: For the street signs, polygons were used to closely follow the irregular shapes of the signs.
Step 3: A team of annotators worked collaboratively, with supervisors reviewing annotations every 500 images.
Step 4: The tracking feature was enabled for moving cars, allowing for faster annotation of vehicle trajectories across video frames.
Outcome:
The project was completed on time, with over 95% annotation accuracy, which was later used to train the object detection model, significantly improving the vehicle’s ability to detect objects in real-time.
By following these steps, examples, and best practices, you can ensure that your annotations are of high quality, accurate, and ready for machine learning model training. The key to success in annotation projects lies in selecting the appropriate tools, maintaining consistency, and regularly reviewing progress to ensure quality control.
Automating Annotation with CVAT
1 Integrating CVAT with External Tools
CVAT supports the integration of external machine learning models to assist in the annotation process. Here’s how to do it:
- Set up the pre-trained model: Choose a model like YOLO or Faster R-CNN that can automatically label data.
- Connect the model to CVAT: Modify the CVAT configuration to include the model’s API or integration point.
Once set up, the model will assist by suggesting annotations, which annotators can then verify or refine.
2 Exporting and Importing Annotations
CVAT supports a variety of formats for exporting annotations, including:
- COCO: Ideal for object detection and segmentation tasks.
- PASCAL VOC: Another format for object detection tasks.
- TFRecord: Used by TensorFlow.
Importing annotations from other sources (like previous CVAT tasks or other tools) is also straightforward via the import feature.
Managing and Monitoring the Project
1 Task Management
Efficient project management is key to handling large-scale annotation tasks. CVAT lets you:
Split tasks: Divide large datasets into manageable chunks.
Track progress: Monitor task completion and manage deadlines.
Monitor performance: Use CVAT’s built-in tools to check the status of each task.
2 Quality Control
To ensure high-quality annotations:
Set standards: Define quality criteria for annotations, such as accuracy and consistency.
Review tasks: Supervisors can review the work submitted by annotators and suggest corrections.
Iterative improvements: After reviewing annotations, feedback can be given to improve future annotation processes.
Exporting Data and Project Completion
1 Data Export Options
Once annotations are completed, you can export data in various formats that are compatible with machine learning tools. To export:
Go to the Tasks section.
Select the task and click Export.
Choose the format (COCO, PASCAL VOC, TFRecord, etc.) and proceed.
2 Preparing for Machine Learning Model Training
When exporting data, make sure the annotations are formatted correctly for the task at hand. For example:
Object Detection: Ensure bounding box coordinates are correct.
Image Segmentation: Verify the polygon or mask annotations are clean.
3 Archiving Projects
CVAT allows you to archive completed projects for future reference. You can store them on your server or export them to cloud storage for safekeeping.
Conclusion
By following the steps outlined in this guide, you can effectively set up CVAT, manage annotation tasks, and extract data ready for training machine learning models. CVAT’s flexibility and range of features make it an excellent choice for teams handling large-scale annotation projects. With practice, you’ll be able to streamline your annotation workflow and ensure high-quality labeled data for your AI and machine learning applications.