Introduction
In the fast-paced world of computer vision, object detection remains a fundamental task. From autonomous vehicles to security surveillance and healthcare, the need to identify and localize objects in images is essential. One architecture that has consistently pushed the boundaries in real-time object detection is YOLO – You Only Look Once.
YOLOv12 is the latest and most advanced iteration in the YOLO family. Built upon the strengths of its predecessors, YOLOv12 delivers outstanding speed and accuracy, making it ideal for both research and industrial applications. Whether you’re a total beginner or an AI practitioner looking to sharpen your skills.
In this guide will walk you through the essentials of YOLOv12—from installation and training to advanced fine-tuning techniques.
We’ll start with the basics: What is YOLOv12? Why is it important? And how is it different from previous versions?
What Makes YOLOv12 Unique?
YOLOv12 introduces a range of improvements that distinguish it from YOLOv8, v7, and earlier versions:
Key Features:
Modular Transformer-based Backbone: Leveraging Swin Transformer for hierarchical feature extraction.
Dynamic Head Module: Improves context-awareness for better detection accuracy in complex scenes.
RepOptimizer: A new optimizer that improves convergence rates.
Cross-Stage Partial Networks v3 (CSPv3): Reduces model complexity while maintaining performance.
Scalable Architecture: Supports deployment from edge devices to cloud servers seamlessly.
YOLOv12 vs YOLOv8:
| Feature | YOLOv8 | YOLOv12 |
|---|---|---|
| Backbone | CSPDarknet53 | Swin Transformer v2 |
| Optimizer | AdamW | RepOptimizer |
| Performance | High | Higher |
| Speed | Very Fast | Faster |
| Deployment Options | Edge, Web | Edge, Web, Cloud |
Installing YOLOv12: Getting Started
Getting started with YOLOv12 is easier than ever before, especially with open-source repositories and detailed documentation. Follow these steps to set up YOLOv12 on your local machine.
Step 1: System Requirements
Python 3.8+
PyTorch 2.x
CUDA 11.8+ (for GPU)
OpenCV, torchvision
Step 2: Clone YOLOv12 Repository
					git clone https://github.com/WongKinYiu/YOLOv12.git
cd YOLOv12
Step 3: Create Virtual Environment
					python -m venv yolov12-env
source yolov12-env/bin/activate  # Linux/Mac
yolov12-env\Scripts\activate     # Windows
Step 4: Install Dependencies
pip install -r requirements.txt
Step 5: Download Pretrained Weights
YOLOv12 supports pretrained weights. You can use them as a starting point for transfer learning:
wget https://github.com/WongKinYiu/YOLOv12/releases/download/v1.0/yolov12.pt
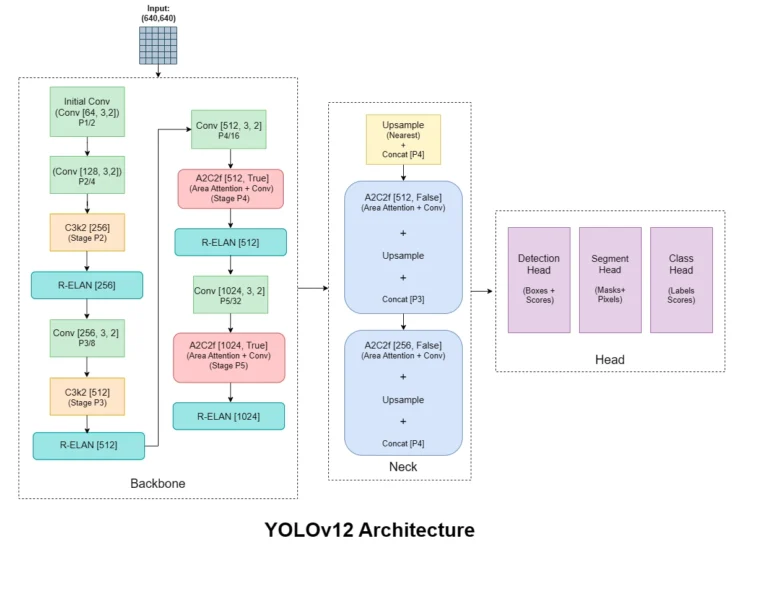
Understanding YOLOv12 Architecture
YOLOv12 is engineered to balance accuracy and speed through its novel architecture.
Components:
Backbone (Swin Transformer v2): Processes input images and extracts features.
Neck (PANet + BiFPN): Aggregates features at different scales.
Head (Dynamic Head): Detects object classes and bounding boxes.
Each component is customizable, making YOLOv12 suitable for a wide range of use cases.
Innovations:
Transformer Integration: Brings better attention mechanisms.
RepOptimizer: Trains models with fewer iterations.
Flexible Input Resolution: You can train with 640×640 or 1280×1280 images without major modifications.
Preparing Your Dataset
Before you can train YOLOv12, you need a properly labeled dataset. YOLOv12 supports the YOLO format, which includes a .txt file for each image containing bounding box coordinates and class labels.
Step-by-Step Data Preparation:
A. Dataset Structure:
					/dataset
  /images
    /train
      img1.jpg
      img2.jpg
    /val
      img1.jpg
      img2.jpg
  /labels
    /train
      img1.txt
      img2.txt
    /val
      img1.txt
      img2.txt
B. YOLO Label Format:
Each label file contains:
<class_id> <x_center> <y_center> <width> <height>
All values are normalized between 0 and 1. For example:
0 0.5 0.5 0.2 0.3
C. Tools to Create Annotations:
Roboflow: Drag-and-drop interface to label and export in YOLO format.
LabelImg: Free, open-source tool with simple UI.
CVAT: Great for large datasets and team collaboration.
D. Creating data.yaml:
This YAML file is required for training and should look like this:
					train: ./dataset/images/train
val: ./dataset/images/val
nc: 3
names: ['car', 'person', 'bicycle']
Training YOLOv12 on a Custom Dataset
Now that your dataset is ready, let’s move to training.
A. Training Script
YOLOv12 uses a training script similar to previous versions:
python train.py --data data.yaml --cfg yolov12.yaml --weights yolov12.pt --epochs 100 --batch-size 16 --img 640
B. Key Parameters Explained:
--data: Path to thedata.yaml.--cfg: YOLOv12 model configuration.--weights: Starting weights (use''for training from scratch).--epochs: Number of training cycles.--batch-size: Number of images per batch.--img: Image resolution (e.g., 640×640).
C. Monitor Training
YOLOv12 integrates with:
TensorBoard:
tensorboard --logdir runs/train
Weights & Biases (wandb): Logs loss curves, precision, recall, and more.
D. Training Tips:
Use GPU if available; it reduces training time significantly.
Start with lower epochs (~50) to test quickly, then increase.
Tune batch size based on your system’s memory.
E. Saving Checkpoints:
By default, YOLOv12 saves model weights every epoch in /runs/train/exp/weights/.
Evaluating and Tuning the Model
Once training is done, it’s time to evaluate your model.
A. Evaluation Metrics:
Precision: How accurate the predictions are.
Recall: How many objects were detected.
mAP (mean Average Precision): Balanced view of precision and recall.
YOLOv12 generates a report automatically after training:
results.png
B. Command to Evaluate:
python val.py --weights runs/train/exp/weights/best.pt --data data.yaml --img 640
C. Tuning for Better Accuracy:
Augmentations: Enable mixup, mosaic, and HSV shifts.
Learning Rate: Lower if the model is unstable.
Anchor Optimization: YOLOv12 can auto-calculate optimal anchors for your dataset.
Real-Time Inference with YOLOv12
YOLOv12 shines in real-time applications. Here’s how to run inference on images, videos, and webcam feeds.
A. Inference on Images:
python detect.py --weights best.pt --source data/images/test.jpg --img 640
B. Inference on Videos:
python detect.py --weights best.pt --source video.mp4
C. Live Inference via Webcam:
python detect.py --weights best.pt --source 0
D. Output:
Detected objects are saved in runs/detect/exp/. The script will draw bounding boxes and labels on the images.
E. Confidence Threshold:
Add --conf 0.4 to increase or decrease sensitivity.
Advanced Features and Expert Tweaks
YOLOv12 is powerful out of the box, but fine-tuning can unlock even more potential.
A. Custom Backbone:
Switch to MobileNet or EfficientNet for edge deployment by modifying the yolov12.yaml.
B. Hyperparameter Evolution:
YOLOv12 includes an automated evolution script:
python evolve.py --data data.yaml --img 640 --epochs 50
C. Quantization:
Post-training quantization (INT8/FP16) using:
TensorRT
ONNX
OpenVINO
D. Multi-GPU Training:
Use:
python -m torch.distributed.launch --nproc_per_node 2 train.py ...
E. Exporting the Model:
python export.py --weights best.pt --include onnx torchscript
YOLOv12 Use Cases in Real Life
Here are popular use cases where YOLOv12 is being deployed:
A. Autonomous Vehicles
Detects pedestrians, cars, road signs in real time at high FPS.
B. Smart Surveillance
Recognizes weapons, intruders, and suspicious behaviors with minimal delay.
C. Agriculture
Monitors plant health, counts fruits, and detects pests from drone footage.
D. Healthcare
Assists in X-ray anomaly detection and cell segmentation.
E. Retail & Inventory
Counts customers, tracks shelf stock, and detects product placement.
Best Practices for Deployment
Once your model is trained, think about deploying it efficiently:
A. Lightweight Deployment:
Export to ONNX or TorchScript for minimal overhead.
Use
OpenCV DNNorTensorRTfor real-time inference on edge.
B. Dockerize the Model:
					FROM pytorch/pytorch:latest
COPY . /app
WORKDIR /app
RUN pip install -r requirements.txt
CMD ["python", "detect.py"]
C. Deploy via Flask:
Create a simple REST API to serve detections via HTTP POST.
D. Cloud Deployment:
Use platforms like AWS Sagemaker, Azure ML, or Google Vertex AI.
Troubleshooting Common Issues
Here are some common errors and how to fix them:
A. CUDA Out of Memory
Reduce batch size.
Use mixed precision (
--fp16).
B. Wrong Bounding Boxes
Check that label files are in YOLO format.
Verify correct image-label pairs.
C. No Detections
Increase epochs.
Lower confidence threshold (
--conf 0.3).Verify dataset annotations.
D. Training Stuck
Use
topornvidia-smito monitor resource usage.Avoid huge image sizes (e.g., 1280×1280) on low RAM/GPU.
Conclusion: Your Journey from Novice to Expert
Congratulations! You’ve walked through the full lifecycle of training and deploying a YOLOv12 model. From setting up your environment and annotating datasets, to real-time deployment and fine-tuning—this guide serves as your foundation to becoming an expert.
YOLOv12 is the culmination of years of advancement in object detection research. Its combination of speed, modularity, and accuracy makes it suitable for a wide range of tasks in industry and research. The best way to solidify your skills? Start building projects! Try fine-tuning YOLOv12 on niche datasets—wildlife tracking, sports analytics, or manufacturing defects.
Remember: Every great AI developer started with their first image and first detection. Now it’s your turn to scale that up with YOLOv12.